
Category Archives: VMware

Presenting with a Robot – True Hackathon Style!

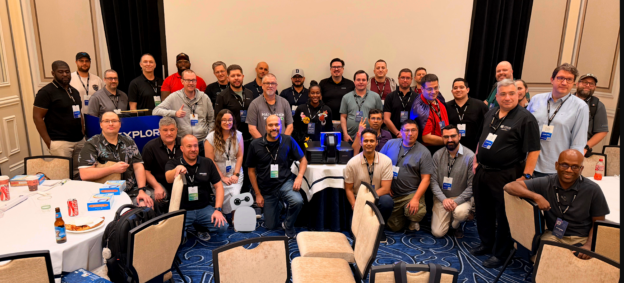
Every year at the VMware Explore Hackathon in Las Vegas, we kick off the evening with the usual housekeeping. You know the drill: going over the schedule, explaining how solo hackers get matched into teams, running through the hardware prizes, introducing our guest mentors, and explaining how the judging works. Usually, that means standing on stage with a clicker and talking through a slide deck.

This year, I had Kit, my Reachy Mini robot, sitting on my desk. And whilst there are plenty of fun demos you can run with a robotic head, I thought: why should I do all the talking when I have a robot capable of expressive gestures, speech synthesis, and head tracking?

Why not let Kit present the hackathon opening to the room?

It sounded like a brilliant idea on paper. In practice, making a physical robot co-present on a conference stage in front of a live audience requires a lot more than just piping text into a speech model. The robot needs stage presence. It needs to look at the audience, turn its head to glance at the slide on the big projector screen, execute expressive antenna and head motions, and change the slides automatically at the right moment.

So we built reachy-mini-presenter, an open source presentation app for Reachy Mini. Here is how it came together, what made it work, and what we learned when taking a robot on stage.

See Kit in Action at the Hackathon

Before getting into the code and architecture, here is the live video of Kit co-presenting the hackathon kickoff at VMware Explore 2026:

Hearing a tiny robot announce to a ballroom full of developers that it was my virtual robotic slave, introduce Bob Plankers, warn everyone that they will be judged, and hand back to its human overlord set exactly the right tone for the evening.

What It Takes to Share a Stage With a Robot

Giving a speech through a robot is easy if you do not care how it looks. You send an audio stream to a speaker and let the robot sit there motionless. But that completely defeats the point of using an embodied robot.

To feel like a genuine co-presenter on stage, the system had to solve four key problems:

  • Keep the slides on the big screen in lockstep with the spoken audio without requiring a human to hit a clicker.
  • Synchronise physical head gaze and antenna emotions to the exact words being spoken.
  • Fit naturally into standard presentation workflows so anyone can write or edit a deck in Google Slides, PowerPoint, or Markdown.
  • Run reliably in a convention centre environment where venue Wi-Fi is notoriously unpredictable.

If any of those pieces fail, the illusion breaks immediately.

The Speaker Notes Are the Script

The biggest breakthrough in the design was deciding where the robot directives should live. We did not want a complex external timeline editor or a custom visual choreography tool. Presenters already write their scripts in speaker notes.

So we turned speaker notes into a stage script by supporting inline directives. You write your normal notes, and sprinkle in robot commands using brackets:
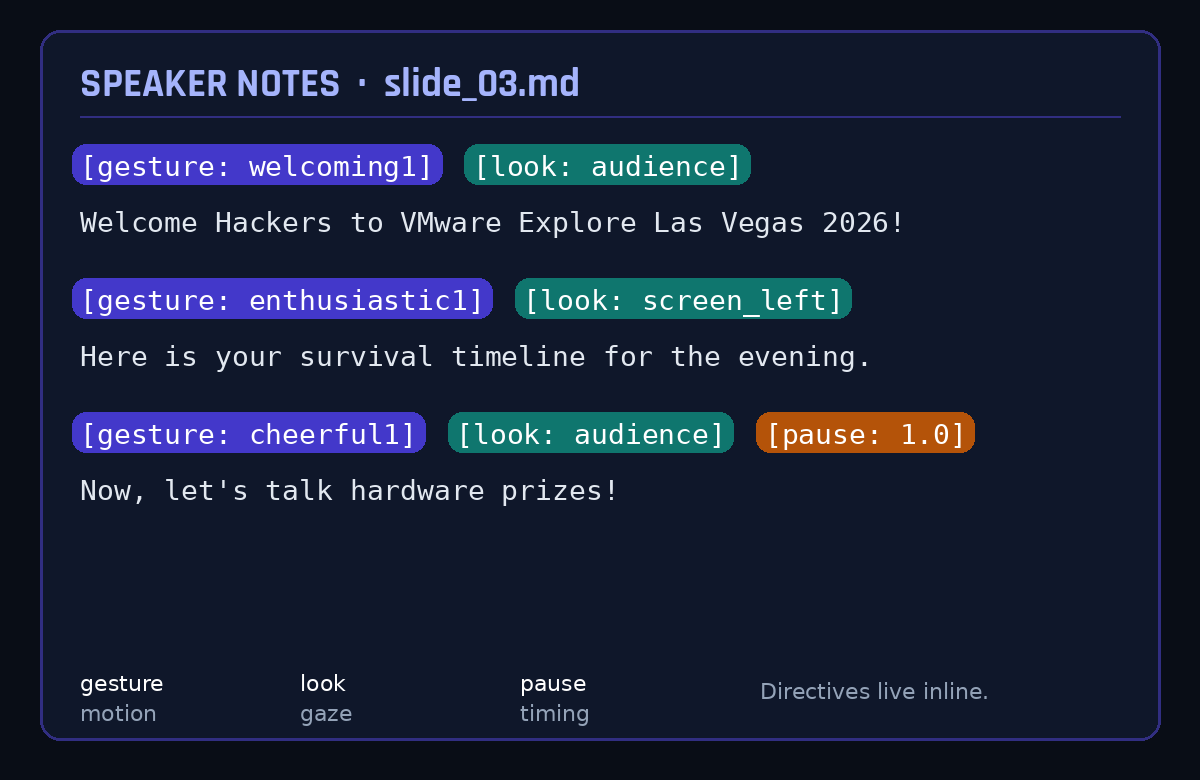
The parser extracts these directives on the fly:

  • Gaze orientations orient the robot head dynamically toward the audience or the presentation screen.
  • Expressive motion gestures trigger Pollen Robotics recorded move trajectories.
  • Timing pauses let the robot wait for audience laughter or applause before resuming speech.
  • Head wobbles and antenna drift run continuously during speech to mimic natural human speaking cadences.

When Kit referenced the timeline slide on the projector, it turned its head toward the screen on its left, delivered the line, and then turned back to face the audience. That single behaviour transformed it from a talking speaker into a presenter.

Under the Hood: Three Pieces, One Show

The application runs as a local FastAPI service that integrates natively into the Reachy Mini desktop application ecosystem.
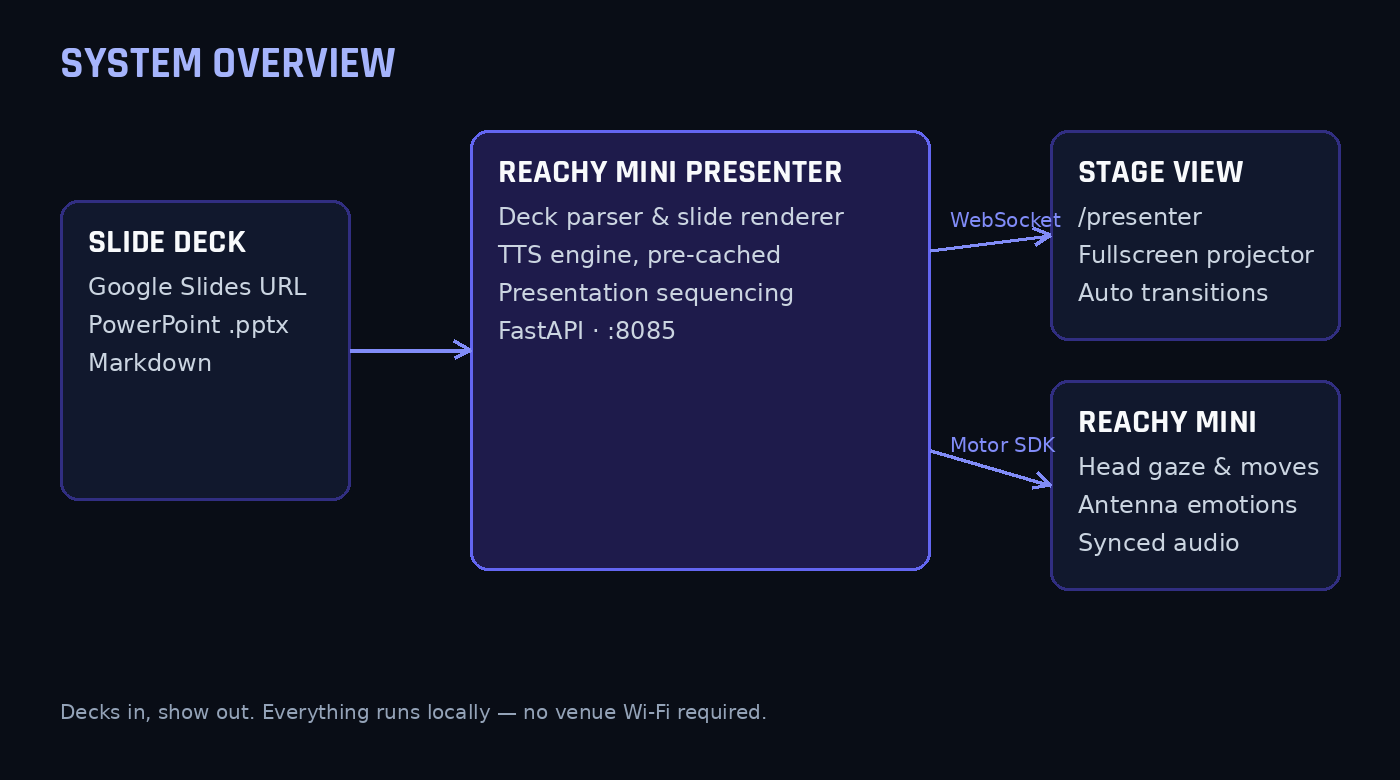
The design separates presentation into two browser views:

  • The presentation stage view at slash presenter is projected onto the conference hall screens, showing high-resolution rendered slide graphics that transition automatically via WebSockets.
  • The control dashboard view at the root URL runs on the operator laptop, providing slide thumbnails, live speaker note previews, playback controls, and manual gesture triggers.

For deck ingestion, we built support for Google Slides, PowerPoint files, and Markdown. For Google Slides, you simply paste the presentation share link into the dashboard. The app fetches the deck, parses the shapes and notes, renders high-resolution slide images using LibreOffice or Keynote CLI, and caches everything locally.

The Golden Rule: Never Trust Venue Wi-Fi

If you take only one lesson away from this post, let it be this: never rely on real-time cloud text-to-speech during a live stage presentation.

Conference Wi-Fi in a room packed with hundreds of engineers is always a gamble. If an API call stutters or drops packets, the robot freezes mid-sentence, the slide does not advance, and everyone stares at an awkward silent robot.

To avoid this, reachy-mini-presenter pre-renders and caches every spoken phrase locally as WAV files before the presentation starts. We supported local neural voices via Kokoro and Edge TTS, along with cross-platform native audio playback engines:

  • macOS uses the native afplay utility.
  • Windows uses the low-level Windows multimedia MCI sound subsystem.
  • Linux uses ffplay or mplayer.

Because the entire audio pipeline is cached locally on the laptop before walking onto the stage, the presentation runs with zero network dependency during the actual talk.

Stage Fright: Notes From a Live Robot

Putting hardware on stage always delivers a few surprises. Here is what we had to debug:

  • Audio levels in an exhibition hall need serious headroom because a desk speaker that sounds loud in an office is virtually inaudible in a hall with several hundred people talking. We ended up with a strategicly placed mic hooked directly into the venue sound system.
  • Motor kinematics limits triggered warnings during fast transitions when moving between an extreme look-up pose and an enthusiastic celebration gesture in one frame, which we smoothed out with easing curves.
  • Comic timing requires deliberate pause directives because in early dry runs the robot steamrolled straight through punchlines without waiting for the room to laugh. Inserting explicit one-second and two-second pause directives after jokes allowed room for audience reaction before the next slide loaded.

Your Turn: Run It Yourself

The best part about the Reachy Mini ecosystem is that you do not need to clone git repositories or mess around in a terminal to get this working.

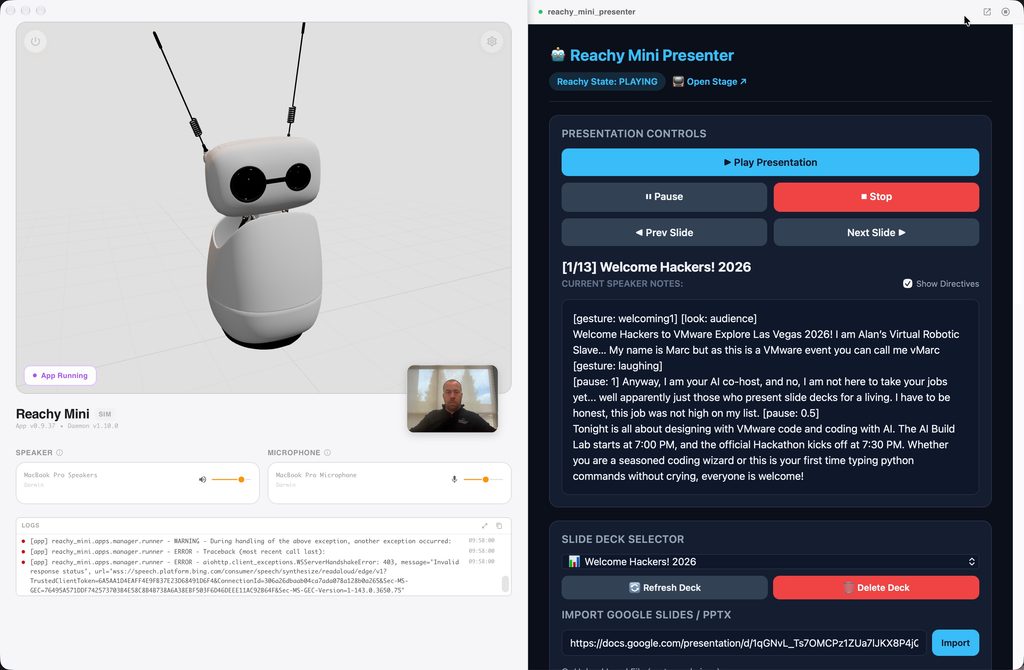
If you have a Reachy Mini, you can install and run the app with one click directly inside the official Reachy Mini Control desktop app. Open the app catalog in Reachy Mini Control, search for Reachy Mini Presenter, and hit install. It downloads into the robot app environment and launches right from your dashboard.
I also created a dedicated website for the project on Hugging Face Spaces:

Reachy Mini Presenter on Hugging Face

The site includes an interactive preview showing how the robot moves and reacts to slide directives, a full reference for speaker note tags, and a catalog of supported gestures.

Once you launch the app, you will have two interfaces ready to go:

  • The control dashboard at http://localhost:8085/ lets you load decks, review speaker notes, and drive the presentation.
  • The presentation stage at http://localhost:8085/presenter goes onto a projector or secondary display to show fullscreen slides that advance automatically in sync with the robot.

If you want to poke around under the hood, tweak the Python code, or add custom animations, the source code is completely open on the Hugging Face Space repository as well.

Wrapping Up

Building reachy-mini-presenter was one of the most rewarding robotics projects I have worked on recently. It took Kit from being an interesting desk gadget to an active, helpful participant in a major community event. The reaction from the room at VMware Explore was incredible, and seeing developers laugh and cheer as a robot explained hackathon rules made all the late-night motor tuning completely worth it.

Give it a spin with your own slide decks, experiment with the speaker note directives, and let me know what you build!

The hackathon overall was a great success and always one of my favourite sessions at VMware Explore, thanks to everyone who attended and the winners of prizes, some awesome innovations were created as always!

Edge Compute at VMware Explore Barcelona

Edge Compute at VMware Explore Barcelona

Sessions

Recently I started a new role at VMware focusing on the edge as part of the Service Provider & Edge Business Unit, I was excited by this move as the edge has been a focus point of mine for the last year now working in OCTO on Project Keswick.

There are so many aspects I am excited about working on edge compute, the most exciting part has to be the use cases I am seeing at the edge, these are totally different to the datacenter and are so much closer to the core business processes and critical to modernization of the features which have often long existed but are looking to be done in a faster, more resilient and more economical way. Anyway, more to come on this as I bring my blog back to life and start to focus more on everything edge related.

Lets start the ball rolling with some great ways to learn more about this exciting area of IT, coming up soon is VMware Explore Barcelona 6-9 Nov, I will be there talking to customers, partners and analysts and presenting the latest and greatest information from VMware.

My Sessions and whereabouts

If you are as excited about the edge as I am or would just like to chat please reach out to me, I would love to catch up and chat, hit me up on twitter (I cant bring myself to call it x) at @alanrenouf. You can also find me at my sessions below or at the edge booth in the solutions exchange.

Session ID / LinkTitleSpeakersSession TypeDate / Time
1999VMware Edge Compute Stack Reference Architecture Deep DiveMichael Wright, Sven Gmelin, Alan RenoufTutorialMonday, Nov 6 1:00pm – 2:30pm
CTEXVMware Edge Cloud Orchestrator – Scaling & deploying ESXi and Kubernetes at the Edge with Desired State Management & GitopsAlan RenoufCTEXTuesday 7th 11.45am – 12.45pm
23386VMware {code} Hackathon – MUST ATTENDCome along and enjoy some fun, you don’t have to be able to code!HackathonMonday, Nov 6
12:45 PM – 1:00 PM

Edge Keynote Related Sessions

These are a must watch, full of awesome new announcements, new tech and fantastic customer stories:

ID / LINKTitleSpeakersSESSION TYPEDAT / TIME
2161Solution Keynote: Everything Everywhere All at Once – Living on the Edge with VMware Sanjay Uppal & OthersKeynoteTuesday, Nov 7 2:45 PM – 3:15 PM
2157Technology Innovation Showcase Kit Colbet, Chris Wolf and othersKeynoteTuesday, Nov 74:00 PM – 5:00 PM 

Edge Compute Sessions

There will be lots of great sessions from my colleagues, partners we work with and customers who are doing awesome things at the edge, I am going to try and attend as many as I can

Session ID / LinkTitleSpeakersSession TypeDate / Time
1188Why ZEISS Semiconductor Will Virtualize Their Factory SystemsStephan Wolf, Martin Spaniol, Lars BischofBreakout Weds, Nov 8 – 2:00pm – 2:45pm
1643Energy Industry RoundtableAlexandra Baleta, Olga Grbovic, Chris MutchierTutorialMonday, Nov 6 – 4:00pm – 5:30pm
1663A New Era for Manufacturing:  Keep the World Moving, No Matter WhatSaadat Malik, Alexandra Baleta, Ronny Hendrych, Henning Loeser, Lars BischofTutorialMonday, Nov 6 – 2:00pm – 3:30pm
1718Retail Digital Transformation and the Future Store of TodayRyan Wehner, Stephen Byrne, Andre Schaefer, Arron LockTutorialMonday, Nov 6 – 2:00pm – 3:30pm
1987What’s New in Edge Compute Stack?Saadat Malik, Anand SrinivasBreakoutTuesday, Nov 7 – 10:30am – 11:15am
1992Edging Ahead Data-Driven Decisions for Edge AI with RabbitMQ and OpenVinoMichael Wright, Roger FreixaBreakoutThurs, Nov 9 – 12:30pm – 1:15pm
2000Transforming Utilities with VMware Edge Compute StackDavid Fry, Kennet NymanBreakoutWeds, Nov 8 – 3:15pm – 4:00pm
2001Transforming the Retail Experience with VMware Edge Compute StackCharles Cockshoot, Abhilasha ChoudhriBreakoutWeds, Nov 8 9:00am – 9:45am
2002Are you afraid of adopting Private 5G? Address your Fears with VMware PMNRam VenketaramaniBreakoutWeds, Nov 8 – 12:45pm – 1:45pm
2003VMware Edge Compute Stack – Practical Use Cases and SolutionsKangwarn Chinthammit, Martin Krentzer, Ben BrillatBreakoutTuesday, Nov 7 – 11:45am – 12:15pm
2005Ask Us About Edge Compute Stack and Edge Use CasesKangwarn ChinthammitMeet The ExpertsTuesday, Nov 7 1:30 PM – 2:00 PM & Wednesday, Nov 8 2:30 PM – 3:00 PM

Solutions Exchange

Make sure you also head to the VMware booth in the solutions exchange, I will be hanging around the edge area as there will be a lot of exciting demos and booths showing what we can do with Edge Compute, make sure you check out the lego manufacturing demo!

Looking forward to seeing you there!

Monitoring processes inside a vm with PowerCLI

As part of a large scale data analysis project I was working on recently I used Horizon View and Instant clones to allow me to deploy hundreds of VMs based on my original templated VM which had my app I wanted to use to take in the data, transform it and then return a result. Its important to note that this app was never written to work in a batch mode, it literally took one input and gave an output based on a number of factors.

Whilst this post is not about the benefits of Instant Clones, let me tell you, once I had the original template VM working correctly and optimized for performance it worked like a charm, there is something to be said for the simplicity and efficiency of instant clones and the memory sharing techniques it uses to be able to run hundreds of essentially the same VM.

Once I had these VMs deployed via Horizon I could easily send a job to each VM and tell it to run the job, as these jobs however took an indeterminate amount of time to crunch the data, I needed a way to monitor them and let me know when all the jobs had finished on all the VMs so I could pull the data to analyze it.

First I went down the route of using Invoke-VMScript to hook inside the VM’s and see if the process was running, this however took a long time to complete on 100’s of virtual machines and the monitoring job often took over 20 minutes to monitor the VMs and tell me if the job was completed… far too long for what I needed. So after some googling I learned from my good friend William Lam that there was a new API available that through VMtools would update the GuestInfo with the processes running inside the VM on a configurable timely basis (see his post here), this allowed me to essentially push the information externally to the VM Guest Operating system and grab the info when I needed it to see if my process was running.

William had also written a handy function which I adjusted to work with an array of VMs and tell me if the process was running.

Using these new found skills I was easily able to write a function that allowed me to pull the running processes from the VMs and remove them from the list as that process finished inside the VM, for the icing on the cake I even got it to update me in slack on how it was doing 😉

So i thought I would share this script and encourage you to think about using this way which is much easier and a more performant way to pull the results of the running processes..

Monitoring Script

Function Send-SlackMessage ($Channel = "#MyProjectChannel", $Message) {
        
    $payload = @{ 
        "channel"    = $Channel
        "icon_emoji" = ":datacenter:"
        "text"       = $Message
        "username"   = "DC Script"
    }

    Invoke-WebRequest `
        -UseBasicParsing `
        -Body (ConvertTo-Json -Compress -InputObject $payload) `
        -Method Post `
        -Uri "https://myslackhookurl" | Out-Null
}

Function Get-VMApplicationInfo {
<#
    .DESCRIPTION Retrieves discovered applications running inside of a VM
    .NOTES  Author:  William Lam
    .NOTES  Site:    www.virtuallyghetto.com
    .NOTES  Reference: http://www.virtuallyghetto.com/2019/12/application-discovery-in-vsphere-with-vmware-tools-11.html
    .PARAMETER VM
        VM Object
    .PARAMETER Output
        CSV or JSON output file
    .EXAMPLE
        Get-VMApplicationInfo -VM (Get-VM "DC-01")
    .EXAMPLE
        Get-VMApplicationInfo -VM (Get-VM "DC-01") -UniqueOnly
    .EXAMPLE
        Get-VMApplicationInfo -VM (Get-VM "DC-01") -Output CSV
    .EXAMPLE
        Get-VMApplicationInfo -VM (Get-VM "DC-01") -Output JSON
#>
    param(
        [Parameter(Mandatory=$true)]$VM,
        [Parameter(Mandatory=$false)][ValidateSet("CSV","JSON")]$String]$Output,
        [Parameter(Mandatory=$false)][Switch]$UniqueOnly
    )

    $appInfoValue = (Get-AdvancedSetting -Entity $VM -Name "guestinfo.appInfo").Value

    if($appInfoValue -eq $null) {
        Write-Host "Application Discovery has not been enabled for this VM"
    } else {
        $appInfo = $appInfoValue | ConvertFrom-Json
        $appUpdateVersion = $appInfo.updateCounter

        if($UniqueOnly) {
            $results = $appInfo.applications | Sort-Object -Property a -Unique| Select-Object @{Name="Application";e={$_.a}},@{Name="Version";e={$_.v}}
        } else {
            $results = $appInfo.applications | Sort-Object -Property a | Select-Object @{Name="Application";e={$_.a}},@{Name="Version";e={$_.v}}
        }

        Write-verbose "Application Discovery Time: $($appInfo.publishTime)"
        if($Output -eq "CSV") {
            $fileOutputName = "$($VM.name)-version-$($appUpdateVersion)-apps.csv"

            Write-Host "`tSaving output to $fileOutputName"
            ($appInfo.applications) | ConvertTo-Csv | Out-File -FilePath "$fileOutputName"
        } elseif ($Output -eq "JSON") {
            $fileOutputName = "$($VM.name)-version-$($appUpdateVersion)-apps.json"

            Write-Host "`tSaving output to $fileOutputName"
            ($appInfo.applications) | ConvertTo-Json | Out-File -FilePath "$fileOutputName"
        } else {
            $results
        }
    }
}


Set-PowerCLIConfiguration -InvalidCertificateAction Ignore -ErrorAction SilentlyContinue -Confirm:$false -DisplayDeprecationWarnings $false | out-null
$ProgressPreference = 'SilentlyContinue'


Connect-viserver vcsa-01a.myenv.local -username Administrator@vsphere.local -password VMware1! | Out-Null
$vms = get-vm InstantCloneVM* | Where-Object {$_.PowerState -eq "PoweredOn"} | Sort-Object Name
Send-Slackmessage -message "Monitor Job Started" 
do {
    foreach ($vm in $vms) {
        Write-Host "Checking $VM status..."
        $result = Get-VMApplicationInfo -VM $VM| Where { $_.Application -eq "MyAppProcess.exe" }
        if (!$result){
            Write-Host "Removing $vm as it has completed"
            $vms = $vms | where { $_.Name -ne $vm.name}
        } else {
            Write-Host "$vm still running"
        }
        if (($vms.count -lt 10) -and (! $sentmail)){
            Send-Slackmessage -message "Less than 10 Sigma VMs left"
            $sentmail = $true
        }
    }
    if (! ($oldnumvms -eq ($vms.count))){
        Send-Slackmessage -message "$($vms.count) VMs still running"
    }
    start-sleep -s 30
    $oldnumvms = $vms.count
}
while ($vms)
Send-Slackmessage -message  "All Jobs Completed"

Screen Sharing and Recording a Oculus Quest 2 with a Windows or Mac Computer

With the Oculus Quest 2 coming out recently and having a new better screen resolution, the previous command line options for Oculus Quest 1  screen sharing I blogged don’t quite work for a good sharing mechanism.

I have played around a little and have come up with some numbers that work quite well with scrcpy, follow the below details to install the packages needed and get up and running with screen sharing of the Oculus Quest 2.

Initial Install and Setup

  1. Enable developer mode on your Oculus Quest 2 (https://www.youtube.com/watch?v=1PTFkLnJRLs)
  2. Plug the USB-C cable into your computer and the Quest, this also works with USB to USB-C
  3. If its your first time plugging into this computer you will need to accept the prompt within the device that allows you to access the device from the computer as per below and check the box to always allow if you want to skip this section in the future
  4. For Windows download and unzip the latest build of scrcpy from https://github.com/Genymobile/scrcpy/releases a direct link for the current version when writing this is here: https://github.com/Genymobile/scrcpy/releases/download/v1.10/scrcpy-win64-v1.10.zip
  5. For Mac the application is available in Homebrew. Install it using the following from a terminal window:
    brew install scrcpy
  6. You will also need adb. you can install this by running the following from a terminal window:
    brew cask install android-platform-tools

Sharing the Screen connected via cable

  1. Open a command prompt (cmd.exe) or and CD into the extracted folder from above
  2. Run the following command:
    scrcpy--crop 1632:1220:100:320 -m 1600 -b 25M

Sharing the Screen connected wirelessly

You will still need a cable to make an initial connection and start the client on the Quest and then you can disconnect and use wirelessly, use the following steps to connect wirelessly:

  1. Follow steps 1-4 above in the setup section
  2. Open a command prompt (cmd.exe) and CD into the extracted folder from above
  3. While the device is connected via a cable run the following to find out what your Quests IP address is in the src section:
    adb shell ip route
    192.168.1.0/24 dev wlan0  proto kernel  scope link  src 192.168.1.198
  4. Now run the following replacing the IP address below (192.168.1.198) as yours:
    adb tcpip 5555
    adb connect 192.168.1.198:5555
  5. Disconnect the cable from the PC and with the device disconnected run the command to connect to the device as below
scrcpy --crop 1632:1220:100:320 -m 1600 -b 25M

Sharing Window

If everything worked above a new window should appear showing the device screen, you can then maximize this for a better demo window.

Testing was done with variations of the scrcpy command but the above was found to be the best viewing size to enable a good demo.

Recording the screen

There is also a great way to capture the screen while mirroring, add the following command options to the end of the scrcpy command above to do this:

 --record file.mp4

To disable mirroring while recording:

 --no-display --record file.mp4

Troubleshooting

Connection Issues

If you get a blank window or are unable to connect when device is plugged in you should be able to run the following command from the same folder above:

PS C:\Users\alan\Downloads\scrcpy-win64-v1.10> .\adb.exe devices
List of devices attached
1PASH9AF839266 device

The device should show above rather than:

PS C:\Users\alan\Downloads\scrcpy-win64-v1.10> .\adb.exe devices
List of devices attached
1PASH9AF839266 unauthorized

If you get the latter then make sure you have enabled developer mode and authorized the device as per step 1-3 above.

Target Machine refused connection when in wireless

If you receive a message like the following: “cannot connect to 192.168.1.198:5555: No connection could be made because the target machine actively refused it. (10061)”

Reconnect the Quest to the computer and go from Step 3 in the wireless connection steps above, this is caused because the client on the quest stopped, normally as you reset the device.

Using Curl with the VMware Cloud on AWS API

Sometimes the initial steps of working with a new API can be hard, often working out how to authenticate and call the APIs can be the hardest part.

I have found that if I break it down into industry standard tooling I can often get a better understanding of how to form this in other languages which I use.

For REST other than calling the API through an API Explorer (like the awesome API explorer built into the VMware Cloud on AWS console) clearly curl is the easiest and probably best industry standard way to test a REST based API.

With this in mind I wanted to show an example of how to use the VMware Cloud on AWS API using CURL, the below example shows how to exchange your refresh token (obtainable from your account) for an access token and then use this to work with all the subsequent APIs in VMware Cloud on AWS or as my example shows, listing the organizations I have access to.

You can download this sample from code.vmware.com here.

New Year, New Look vCheck

Its been a while since I blogged about vCheck but that doesn’t mean there has been lots of work ongoing with the project, in fact there has been multiple releases and hundreds of pull requests with great new plugins checking for even more issues with your vCenter and lots of bug fixes, in fact this project and the community updating and using it is awesome, here are some the current stats:

  • 954 Commits
  • 64 Contributors (Thanks to all here)
  • 66 Open Issues and 269 Closed Issues

Whats more, one of the most recent releases 6.25 here includes a great new look, the new look is based upon VMwares Clarity framework and personally I think it looks fantastic as you can see below:

vCheck Clarity

Also available (currently in the dev branch) is the brand new dark version of the theme as seen below:

vCheck Clarity Dark

Download for free now!

Download the latest version here:  https://github.com/alanrenouf/vCheck-vSphere/archive/master.zip

And the dev branch version here: https://github.com/alanrenouf/vCheck-vSphere/archive/dev.zip


Using PowerCLI to manage VMware Cloud on AWS

Recently VMware released PowerCLI 6.5.4 and one of the great enhancements in this new version is the ability to work with VMware Cloud on AWS (VMC), but what does that mean?

As you may know by now, VMware Cloud on AWS is a great new joint offering from VMware and AWS to provide a VMware SDDC in the public cloud.

If we break this down a little and think about how we might manage this with PowerShell we can see that we are in pretty good shape.

VMC

PowerCLI has always been able to manage our On-Premises SDDC and as the SDDC deployed in VMware Cloud on AWS is still the same software we have always been able to manage that through PowerCLI as well.  With the AWS Tools for Windows PowerShell we have also been able to work with the AWS Services.

So whats new then? Added in PowerCLI 6.5.4 was the ability to manage the VMware Cloud on AWS Service features depicted by the green dotted line in the diagram above. For example, what if i wanted to list all my SDDCs available to me or what if i wanted to automate the creation of a new SDDC or what if I wanted to provision or de-provision a new AWS bare metal instance into my SDDC, well now you can, and all from the same shell.

PowerCLI 6.5.4 VMware Cloud on AWS Module

As mentioned in the VMware PowerCLI 6.5.4 Release Blog Post we now have a new module that allows us to work with the VMware Cloud on AWS service, it gives us 3 new cmdlets:

Connect-Vmc –This cmdlet establishes a connection to a VMware Cloud on AWS server.                              

Disconnect-Vmc – This cmdlet closes the connection to the servers specified by the Server parameter.                

Get-VmcService – This cmdlet retrieves PSObject objects that represent a proxy to a VMware Cloud on AWS API service, it essentially allows us to access 100% of the public VMware Cloud on AWS API.

Whilst these are a great start you really need to work with the Get-VMCService and the properties and methods it brings back to really automate the features.  Luckily William Lam, Brian Graf and I have already been working with this cmdlet and wanted to make it easier to use and also provide examples of how to use the cmdlet to work with any of the features available in the VMware Cloud on AWS API now and in the future…..

VMware Cloud on AWS simple functions

This module adds more functions to enable you to easier work with VMware Cloud on AWS, the included functions so far are:

Get-VMCCommand – Returns all cmdlets for VMware Cloud on AWS in both this module and the VMware official module.

Connect-VMCVIServer – This Cmdlet pulls the default SDDC credentials and connects to your VMC vCenter Server to ease the connection from service to SDDC. 

Get-VMCOrg – Returns the Orgs that you have available in VMware Cloud on AWS.                          

Get-VMCSDDC – Returns all of the SDDCs that you have available to you in VMware Cloud on AWS.

Get-VMCSDDCDefaultCredential – Returns the default credential for a given SDDC.

Get-VMCSDDCPublicIP – Returns your Public IPs for a given SDDC.

Get-VMCSDDCVersion – Returns the SDDC Version.

Get-VMCTask – Returns all of the VMC Tasks.                                             

Get-VMCVMHost – Returns the Host information within VMware Cloud on AWS.

Clearly these are just the first set we have worked on as an example, more functions will be added in the future and probably have been by the time you read this post!

An example of some of these being used is below:

How do I get the module?

The module is available in the PowerShell Gallery here so installing could not be simpler, but of course make sure you have PowerCLI 6.5.4 installed first otherwise this module wont do you much good!

PS> Install-Module -Name VMware.VMC -Scope User

How do I contribute to the module?

This module is also available in Github as part of the /PowerCLI-Example-Scripts repo so please do clone the repo, edit the module and contribute back to make this easy for everyone!


Tech Confessions at VMworld BCN 2017

This year I was introduced to a new show put together by Amy Lewis from http://commsninja.com/ and her team called Tech Confessions or as I like to call it “Bedside confessions of a geek”, unofficially of course!

In this show I was able to relax on the comfy couch while Amy quizzed me on how i got started with virtualization, there was something about that couch that made me very relaxed as I think I took Amy pretty much through my entire career up to the point where I made it on stage with Pat during the VMworld 2017 Barcelona conference.

I was proud to be the first of many to share their bedside confessions so make sure you subscribe to the youtube channel or the podcast to keep up to date with other people sharing their software defined experiences.

Ways to Watch/Listen

You can subscribe to the podcast here, check out the Tech Confessions website here or Follow their Youtube channel here

For now, here is my video to keep you going….

Announcing VMware VR Datacenter Experience

It gives me great pleasure to announce a new open source project from VMware called VMware VR Datacenter Experience, this is an immersive experience that allows you to put on your virtual reality headset and take yourself into a virtual management environment where you will be able to control your vSphere Environment with the wave of a hand or click of a button.

Details

The VMware VR Datacenter Experience allows you to use a HTC Vive headset to enter a virtual datacenter where a virtual representation of each of your hosts is created by integration with the vSphere 6.5 REST API, once these are created the VM’s are dropped onto these hosts, one for each VM currently registered with the host.  In this environment you are able to teleport yourself to each of these hosts and interact with the VMs.

You can pick them up to find out more information about their configuration:

VM Details


You can even drop them into a trashcan to remove them from your datacenter:

VM Trash


We even extended it to work with VMware Cloud on AWS (VMC) where you could literally throw (vMotion) your VM’s from your On-Premises datacenter into VMC.

Showing you the 2D pictures of this virtual reality environment really does not do it justice, you need to try it to believe it!

Background

At VMware we have internal Hackathon’s where we are able to take a couple of days away from our day job to work on projects which we think are interesting and could provide valuable to VMware, this is a great initiative that fosters

innovation, personally I love working for a company that provides this level of free thinking!  Together with William Lam, Yateendra Kulkarni, Vinod Pai and Steve Trefethen, I put a team together and we set out to work on what a VMware Datacenter would look like in Virtual Reality.

I should mention at this point that none of us had developed for VR before, in fact we had never even used the IDE (Unity) before, that was fun!  After a couple of days we were pleased when we managed to produce a single host and VMs on that host all by calling the vSphere 6.5 REST API.

After this and some internal marketing and some spare time hacking away at the project we came up with something pretty cool that later allowed me to realize one of my bucket list items and present on the main VMworld Keynote stage with Pat Gelsinger (VMware CEO).

VMworld Keynote

If you didn’t get a chance to watch the VMworld Barcelona Keynote then please do take 5 minutes out of your time to watch the demo below that shows the full remit of what we expanded this project to work with.

Where Can I Get this?

The initial project is now available and ready for you to download, it has been cut down to its basics so we can build on it and ensure the code we are adding and the functionality is based around user input.

Of course you will need the following:

Check out the project landing page here for more details: https://vmware.github.io/vr-dc-ex/

And if you want to take a look at the code, ask for more features or even contribute back to the project then please checkout the github repo here: https://github.com/vmware/vr-dc-ex

The Full story

At VMworld I had the chance to catch up with Barry Coombs who interviewed my on this complete story, check out the clip below to learn how a small town boy ended up on stage with a Silicon Valley CEO…

Checking you are up to date with PowerCLI

Now that PowerCLI is a module and in the PowerShell Gallery there have been a lot of releases and bug fixes, you would be forgiven for not having the latest version installed or even knowing what the latest version is.

With this in mind and with the latest 6.5.3 version triggering this in my mind, I created a function that checks your installed PowerCLI version against the one thats in the PowerShell Gallery online and lets you know if there is a new version.

Now of course this can be run manually and it will return the results letting you know which modules are out of date:

And once completed of course its easy to update PowerCLI to the latest version:

Even better why not add it to your profile. It does take a couple of seconds to run so maybe you will want to run it on a certain day past a certain time in your profile so it doesn’t slow down every launch of PowerShell you have, here is an example of what I have in my profile where I check every Wednesday after 2PM.

if ( ((Get-Date).tostring('%H') -ge "14" ) -and ( (Get-Date).DayofWeek -eq "Wednesday" ) ) {
        Check-PowerCLIUpdate
}

Check-PowerCLIUpdate Script

Here is the function that allows you to check for updates:

Function Check-PowerCLIUpdate {
    #Based on great module by Jeff Hicks here: http://jdhitsolutions.com/blog/powershell/5441/check-for-module-updates/
    [cmdletbinding()]
    Param()

    # Getting installed modules
    $modules = Get-Module -ListAvailable VMware* | Sort Version -Descending | Select-object -Unique

    #Filter to modules from the PSGallery
    $gallery = $modules.where({$_.repositorysourcelocation})

    # Comparing to online versions
    $AllUpdatedModules = @()
    foreach ($module in $gallery) {

         #find the current version in the gallery
         Try {
            $online = Find-Module -Name $module.name -Repository PSGallery -ErrorAction Stop
         }
         Catch {
            Write-Warning "Module $($module.name) was not found in the PSGallery and therefore not checked for an update"
         }

         #compare versions
         if ($online.version -gt $module.version) {
            $AllUpdatedModules += new-object PSObject -Property @{
                Name = $module.name
                InstalledVersion = $module.version
                OnlineVersion = $online.version
                Update = $True
                Path = $module.modulebase
             } 
         }
    }
    $AllUpdatedModules | Format-Table
    #Check completed

}